PRISM EQ - FLEX User Manual
1. Introduction
Overview
FLEX is an equalizer with 24 independent bands, per-band Dynamic EQ, and Stereo / Left / Right / Mid / Side routing. Multi-Track Spectrum lets you compare the frequency balance of other tracks running FLEX.
Interface overview
- Header: Undo/Redo, PRESET, OS, A/B, RESET, Settings and POWER.
- Monitor & spectrum: input/output spectra, EQ curve, band nodes, OVER and VIEW.
- Control panel: the selected band's EQ, dynamics, EDIT MODE and AUDITION, plus INPUT, OUTPUT and LOW MONO.
- Footer: version, licence status (click it to open the licence screen), BUY during the trial and the Prizlune link.
Getting started
- Double-click empty space in the spectrum plot to add a Bell using an unused band. No band can be added when all 24 are enabled.
- Drag a round node horizontally to change FREQ and vertically to change GAIN. GAIN does not affect HPF / LPF / Notch.
- Use the mouse wheel over a node to adjust Q.
- Click a band number, 1-24, to select it. Double-click the number, or use the band's ON/OFF button, to enable or disable it.
- Click anywhere with no control on it to select no band at all (NO BAND SELECTED). Click a band number or node to select a band again.
Adjusting knobs
Drag a knob vertically, or use the wheel over the knob, its label or its value. Double-clicking a knob resets that value to its default. Direct keyboard entry of numeric values and modifier-key fine dragging are not supported.
2. Installation
Requirements
- Windows (64-bit) and a 64-bit DAW that supports VST3
- A Prizlune account (free), and an internet connection when you start a trial or activate
Download
Download the ZIP from the product page at prizlune.com/products/flex/. The trial and the full version use the same installer, so buyers use this one too.
Installing
- Right-click the downloaded ZIP and choose "Extract All".
- Run
Install PRISM EQ - FLEX.exefrom the extracted folder. - If "Windows protected your PC" appears, click "More info" and then "Run anyway". The installer has no code signature, so this warning may appear.
- When asked "Do you want to allow this app to make changes to your device?", click "Yes". Writing to the shared VST3 folder requires administrator permission.
- Choose a language, accept the licence agreement and follow the instructions.
Installed to: C:\Program Files\Common Files\VST3\PRISM EQ - FLEX.vst3
Loading it in your DAW
Start your DAW and rescan plug-ins if needed. The plug-in appears as [FLEX] PRISM EQ (vendor: Prizlune).
Right after installation it is NOT ACTIVATED, and audio passes through unprocessed. Follow the next chapter to start a trial or activate the full version.
Updating
Run the installer of the new version in the same way to install over the old one. Your licence, presets and display settings are kept.
Uninstalling
Run Uninstall PRISM EQ - FLEX.exe from the ZIP, or remove it from Windows Settings > Apps. Your licence and presets are not deleted, so a reinstall works straight away.
3. Activation and Trial
To use PRISM EQ - FLEX, start a trial or activate the full version with your Prizlune account (free). Before that you can still change parameters, use presets and save projects, but audio passes through unprocessed.
Status
| Footer status | Meaning | Audio |
|---|---|---|
| NOT ACTIVATED | Neither a trial nor the full version is active | Passes through |
| ACTIVATING | Waiting for approval in your browser | As before |
| TRIAL · N DAYS LEFT | Trial running; N is the days left (1 DAY LEFT on the last day) | Processed |
| TRIAL ENDED | The trial period is over | Passes through |
| FULL | Full version | Processed |
Click the footer status to open the licence screen. While NOT ACTIVATED or TRIAL ENDED, a notice bar appears at the top of the product view.

Starting the trial (14 days)
- Click START TRIAL in the notice bar. My Prizlune opens in your browser.
- Sign in with your Prizlune account. If you don't have one, you can create it on that page.
- Check that the code in the browser matches the code in the plug-in, then click Start trial on this computer.
- When the footer shows TRIAL · 14 DAYS LEFT, you're done.
Each account can use the trial once per product, and each computer once as well. During the trial every feature works as in the full version.
Activating the full version
- Buy the product at prizlune.com. It is added to the Prizlune account you buy with.
- Click ACTIVATE in the plug-in (notice bar or licence screen).
- Sign in with the account you bought with, check the code and click Activate on this computer.
- When the footer shows FULL, you're done.
Waiting for approval
After START TRIAL or ACTIVATE, a waiting screen opens in the middle of the plug-in. It shows a large code in the form XXXX-XXXX and the time remaining. Approve the request in your browser within 10 minutes. Once approved, the licence is saved on this computer and takes effect immediately.
- REOPEN BROWSER: opens the approval page in your browser again.
- CANCEL (or Esc): stops the activation and returns to the previous state.
Licence screen
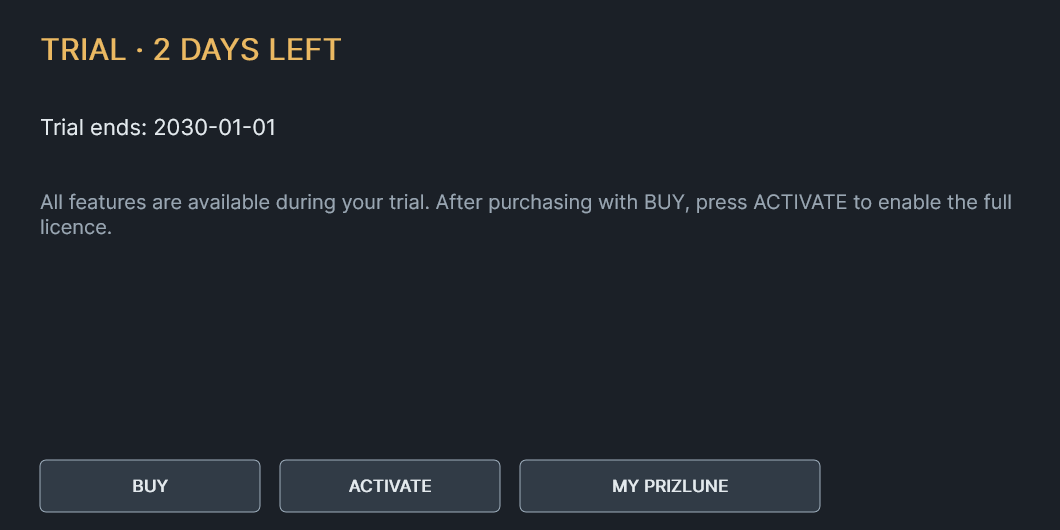
Open it from the footer status or from License at the bottom left of Settings. Close it with the × at the top right or Esc.
- Trial: shows the end date. BUY opens the purchase page; after buying, ACTIVATE switches to the full version. MY PRIZLUNE opens the member page.
- Full: shows the registered email, this computer's name and the activation date. RELOAD LICENSE reads the saved licence again.
Buying during the trial, and when it ends

When the trial ends, the TRIAL ENDED notice bar appears and audio passes through. Your settings and projects are kept. Buy with BUY and activate with ACTIVATE to keep using it.
Several computers and offline use
- License activation connects when you press START TRIAL or ACTIVATE. Activated products work offline. Optional update checks can be disabled in Settings.
- As long as you use your own account, there is no limit to the number of computers. On a new computer or after reinstalling Windows, press ACTIVATE there. You don't need to deactivate the old one.
- You can see your products and activated computers on My Prizlune (account.prizlune.com).
4. EQ and routing
BAND n identifies the selected band. The band's ON/OFF and the dynamics ON/OFF are separate controls.
Filter selection
Click the button showing the current filter name, such as Bell.
| Filter | Main function | GAIN / Dynamics / SLOPE |
|---|---|---|
| Bell | Boost or cut near the centre | Yes / Yes / No |
| Low Shelf | Boost or cut low frequencies | Yes / Yes / No |
| High Shelf | Boost or cut high frequencies | Yes / Yes / No |
| HPF | Attenuate low frequencies | No / No / Yes |
| LPF | Attenuate high frequencies | No / No / Yes |
| Notch | Deep cut near the centre | No / No / No |
FREQ: 20 Hz-20 kHz; centre or corner frequency.
GAIN: -18 dB to +18 dB; unavailable for HPF / LPF / Notch.
Q: 0.10-40.0; sets the bandwidth or shape of Bell, Shelf and Notch. Not used by HPF / LPF, where it shows as unavailable.
SLOPE: 6 / 12 / 18 / 24 / 30 / 36 dB/oct for HPF / LPF. Every slope is a Butterworth response: -3 dB at FREQ with no peak near the cutoff.
EDIT MODE
Select the component processed by this band. Stereo processes both channels; Left / Right process one channel. Mid is the common component of left and right; Side is their difference. Each band has its own mode.
On mono input/output, enabled Stereo / Left / Right / Mid bands are applied serially to the single channel. Side bands have no effect.
AUDITION
Listen to the input frequency range associated with the band's frequency, Q and shape. This does not solo the processed EQ output or a Left / Mid / Side component. The band's GAIN is not applied to the audition signal.
The lit button identifies the band as AUDITION Bn. Press it again, select another band or close the editor to end audition. AUDITION is not stored in a project or preset.
5. Reading the monitor
Spectra and VIEW
INPUT / OUTPUT identify the input and output spectra. Choose Stereo / Left / Right / Mid / Side with VIEW; the label reads ST / L / R / M / S. VIEW changes the spectrum display independently of the bands' EDIT MODE routing.
Nodes, individual shapes and result curves
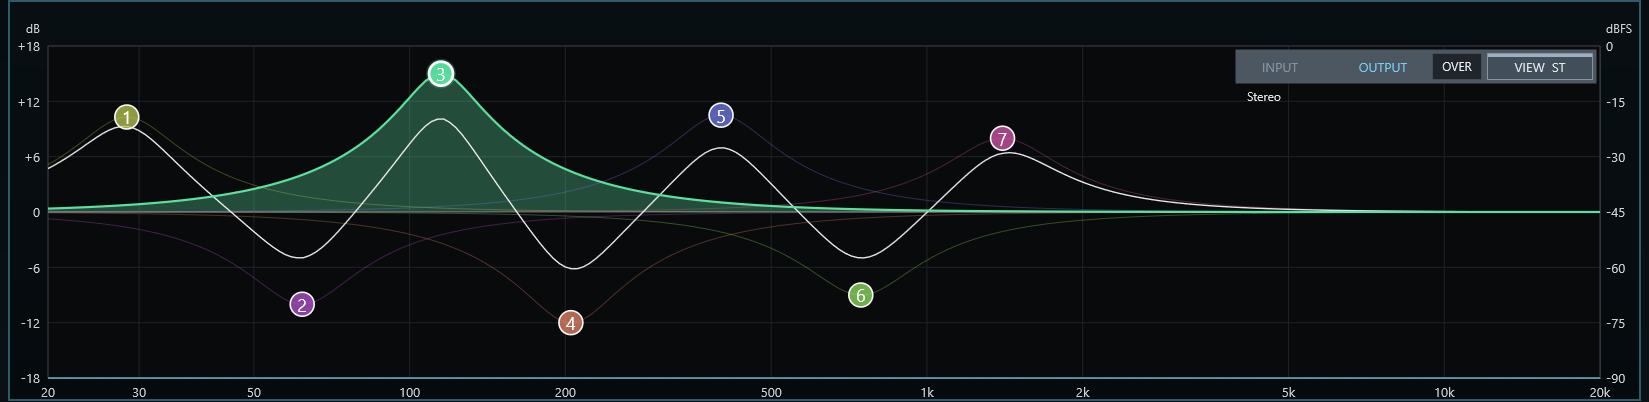
The example uses seven Stereo bands, with the green band 3 selected.
- Numbered nodes show each band's own FREQ and GAIN. Dragging edits that band. HPF / LPF / Notch do not use GAIN, so their nodes sit at 0 dB.
- Curves in the nodes' colours show individual settings. The selected band has a strong outline and fill to 0 dB. Other enabled bands in the same mode have faint outlines. Individual shapes in other modes are hidden.
- Placement result curves combine enabled bands assigned to the same EDIT MODE. The white line above is the Stereo result. Nearby cuts reduce band 3's boost, so its node sits above the white line. This is normal.
| EDIT MODE | Result curve colour |
|---|---|
| Stereo | White |
| Left | Blue |
| Right | Red |
| Mid | Yellow |
| Side | Green |
Selecting a band adds a halo to its node and emphasizes its placement result. Other placement results fade. A mode with no enabled band draws no line.
Individual shapes and nodes represent configured settings. Follow dynamic EQ movement in the result curves. Do not add different placement curves together to read total gain. Clicking empty space clears selection: individual shapes disappear and placement results remain. Selecting a disabled band also shows no individual shapes.
Inside the plot, the crosshair reads frequency and dB. When LOW MONO is active, a vertical marker shows its cutoff.
6. Dynamic EQ
Enabling dynamics
Enable a Bell / Low Shelf / High Shelf band, then turn its dynamics ON/OFF on. The band and dynamics have separate switches. Detection uses the signal after INPUT trim and before the EQ bands.
| Control | Range | Function |
|---|---|---|
| THRESH | -72 to 0 dB | Detection threshold |
| RANGE | -12 to +12 dB | Maximum movement; negative reduces, positive boosts |
| ATTACK | 0.1-500 ms | Response to a rising level |
| RELEASE | 10-3000 ms | Return time after the level falls |
| RATIO | 1.0-20.0 | Movement relative to the level above threshold |
RANGE ghosts
A RANGE ghost shows the placement result if that band reaches its RANGE limit. It uses the band's own placement result as its baseline and the placement's colour. For the selected band, a vertical stem connects the current curve to the destination.
Numbered nodes and individual configured shapes stay at the configured GAIN. Follow actual gain movement in the result curve. RANGE 0 or RATIO 1 produces no dynamic gain change.
A practical starting point
- Choose the target range with FREQ and Q; use AUDITION to check the input band if useful.
- Set the direction and maximum movement with RANGE. Use a negative value for reduction.
- Adjust THRESH and RATIO so the result moves when needed.
- Adjust ATTACK and RELEASE, then compare with dynamics ON/OFF.
Dynamics is unavailable for HPF / LPF / Notch.
7. Global controls and comparison
INPUT / OUTPUT / LOW MONO
INPUT: -24 dB to +24 dB, before the bands and dynamics detection.
OUTPUT: -24 dB to +24 dB, applied to the processed EQ branch. It does not change the dry signal returned by POWER OFF or host bypass.
LOW MONO / FREQ: 0-500 Hz in 5 Hz steps; below 20 Hz is OFF. A 24 dB/oct high-pass filter on the Side component gradually makes the low end more mono. It is not a brick-wall removal of all Side content below the cutoff.
OS (Oversampling)
Select 1x / 2x / 4x / 8x from OS in the header. Higher factors increase the internal processing sample rate and CPU load. Conversion filters also introduce phase changes, high-frequency attenuation and latency. Compare the sound and load rather than assuming the highest factor is always preferable.
| Factor | 1x | 2x | 4x | 8x |
|---|---|---|---|---|
| Reported latency at 44.1 / 48 kHz | 0 | 4 | 5 | 5 samples |
Upper-band attenuation depends on sample rate; at 44.1 kHz / 8x it is about 3.3 dB at 20 kHz. Changing OS requires the DAW to update delay compensation and may briefly interrupt playback in some hosts.
POWER / A/B / RESET
POWER: ON processes EQ; OFF returns latency-aligned dry audio. Host bypass controls the same processing switch.
A / B: compare two independent settings. The first switch to B copies the current A settings. Subsequent edits remain separate. Both banks are stored in the project.
RESET: resets the current bank's sound controls, including OS to 1x. It preserves POWER and does not reset the other bank. All bands in the current bank become disabled and their nodes disappear.
Undo / Redo
Use the arrows to the left of PRESET to undo or redo editor operations. One knob drag is grouped into one operation. This is separate from the DAW's own Undo history. External host edits or automation clear the earlier local history. Closing the editor also ends this history.
8. Preset browser
Open, browse and load
Click PRESET once to open the browser in the central panel area. The header and footer remain available. Click PRESET again, the top-right close button, or Esc to close it.
- Filter the list using search, All / Factory / User / Favorites and categories.
- Click a row to inspect its source, category and memo on the right. Navigate using the wheel, scrollbar, Up/Down, PageUp / PageDown or Home / End.
- Double-click a row, click Load or press Enter to recall it. Loading returns to the model panel.
The selected row and the dot/bold marker for the currently loaded sound are independent. Selecting a row alone does not change the sound. FLEX includes built-in Default; no additional Factory bank is supplied.
Save the current sound
Click Save Current, choose a name and category, then save. Choose an existing category or create one. Replacing a same-named User preset requires confirmation. User presets can be renamed or deleted; Factory presets are protected.
Presets restore the saved POWER state. Loading a preset saved with POWER OFF turns POWER OFF. Loading Default turns POWER ON. This differs from RESET.
Favorites and memos
Click a star to toggle a favorite; registered favorites have a yellow star. Use Save Note to save the free-text memo on the right. Categories, memos and favorites are stored separately from sound settings; you can annotate Factory presets too. Reopen the browser to see changes made by another instance.
Default, Custom and project recall
Editing a recalled sound shows Custom. During the session, source identity follows A/B and Undo/Redo. Projects store sound settings and both banks, but not preset file paths. A fresh instance restored from a project shows Custom, or Default when its settings match the defaults.
User presets: C:\ProgramData\Prizlune\presets\EQ\FLEX\user
Annotations, categories and favorites: .browser-meta in the same folder. Back up both the preset files and this metadata.
9. Settings and OVER
Settings / Display
Settings replaces the central model panel. Use the left navigation to choose Display or Multi Overlay; the selected page appears on the right. Click Settings again, the top-right close button or Esc to close it. You can also switch directly to PRESET. License at the bottom left opens the licence screen.
Display offers UI Scale at 50 / 75 / 100 / 125 / 150 / 175 / 200%. The size is requested after closing the screen; only a size accepted by the DAW is saved. The visual theme is fixed.
Settings → Language sets the language of Settings, the licence screen and notices: Automatic / English / 日本語. Automatic follows the Windows display language. Your choice is remembered.
Multi Overlay / Multi-Track Spectrum
Choose Multi Overlay on the left of Settings to show the track list on the right. OVER opens this same page directly, without a separate window. If no other FLEX is running, the page prompts you to insert one on another track. OVER lights while spectra are overlaid.
- SHOWN / HIDDEN: click a row to toggle an overlay. Click its colour cell to cycle the display colour. Use the wheel to scroll the list.
- Track names: supplied automatically by the DAW. A number or fallback label is used when no name is provided. Names cannot be edited in FLEX.
- OPEN: requests that the other track's FLEX editor open or come forward. SENT means the request was sent; N/A means it was not accepted. Availability depends on host support.
Show/hide and colour settings are shared by FLEX instances in the same host process. Up to eight overlays can be displayed. Separate-process or sandboxed instances may not discover one another. Separate DAW applications cannot share spectra.
The sidebar separates Display, Language and Updates. Headings, descriptions and buttons follow the selected language; Automatic uses the operating system display language. When you open License from Settings and close it with ×, you return to the same interactive settings page.
10. Updates and the product page
Released editions include update checks. When you open the editor, the plug-in checks the public download in the background, approximately once per day. You do not need to sign in again to check for updates.
Update notification
When a newer publication is available, UPDATE appears near the version in the footer. Click it to open this product's page. Read the release information and download the update. Close your DAW before installing the downloaded update.
Settings → Updates
| Control | Action |
|---|---|
| Automatic | ON by default. Turn it OFF to disable automatic requests. This is remembered as a product preference, separate from sound settings. |
| Check now | Checks immediately, including when automatic checks are OFF. |
| Product page | Opens this product's page after public information has been received. The PRIZLUNE logo at the bottom right also opens the product page at any time. |
Working offline
If the check cannot retrieve information, check your connection and try manually later. A failed update check does not stop audio or project saving. The product continues its normal behavior for its license state; activated products work offline.
Update checks are independent of audio processing. Changing automatic checks or using a notification does not alter your sound or the parameters stored in a DAW project.
11. Troubleshooting
| Problem or message | What to do |
|---|---|
| The plug-in doesn't appear in my DAW | Rescan plug-ins in your DAW. Check that C:\Program Files\Common Files\VST3 is included in the scan and that the DAW is 64-bit. |
| The sound doesn't change | While the footer shows NOT ACTIVATED or TRIAL ENDED, audio passes through. Start a trial or activate the full version. Also check that POWER in the header is ON. |
| Could not open your browser | Press REOPEN BROWSER on the waiting screen. Also check that Windows has a default browser. |
| Not approved | The request was cancelled in the browser, or the account has no purchase of this product. Make sure you are signed in with the account you bought with, then press ACTIVATE again. |
| The request expired | It was not approved within 10 minutes. Press ACTIVATE or START TRIAL again. |
| This account or computer has already used the trial | The trial can be used once per product, per account and per computer. Buy with BUY, or press ACTIVATE if you already own it. |
| Could not save the licence | Check free disk space and that you can write to your user folder, then try again. |
| Activation failed | Check your internet connection and any security software or firewall settings, then try again. |
| I bought it but it doesn't show FULL | Check that you are signed in with the account you bought with and that the product appears on My Prizlune, then press ACTIVATE. If you bought with another email address, add that address in My Prizlune's account management and the product will appear. |
If this doesn't solve it, contact us at prizlune.com/contact/. Common questions are answered at prizlune.com/faq/.